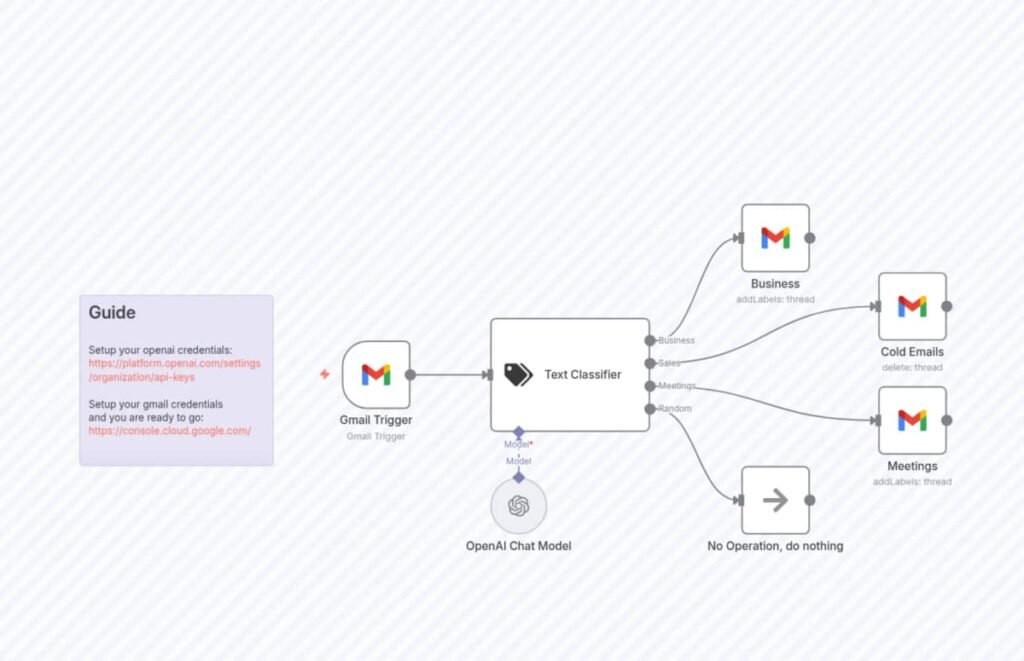
In this complete guide you’ll build an AI email classifier: every email arriving in your Gmail gets read by AI, sorted into categories like Business, Sales or Meetings, and labeled automatically. Your inbox organizes itself.
WHAT YOU NEED
An n8n instance, a Gmail account, and an OpenAI API key. The Gmail connection uses Google OAuth2, which needs a Google Cloud project with the Gmail API enabled (n8n’s docs walk through this once, then it just works).
STEP 1 — ADD THE GMAIL TRIGGER
Create a new workflow named ‘AI Email Classifier’. Add a Gmail Trigger node set to ‘On Message Received’ and connect your Google credentials via OAuth2. Execute it once — it should pull in your most recent email so you can build with real data.
STEP 2 — ADD THE TEXT CLASSIFIER
Add a Text Classifier node after the trigger. Define your categories with short descriptions, for example: Business (work-related), Sales (offers and deals), Meetings (invites and scheduling), Random (everything else). Attach an OpenAI Chat Model node to the classifier’s Model input with your API key.
STEP 3 — ROUTE EACH CATEGORY
The classifier outputs one category per email. After it, add one Gmail node per category using the ‘Add Label’ operation. First create matching labels inside Gmail (Business, Sales, Meetings). Connect each classifier output to its Gmail label node so every email gets the right label automatically.
STEP 4 — HANDLE THE LEFTOVER BRANCH
Connect the ‘Random’ output to a No Operation node — those emails simply stay unlabeled, or route them to archive if you prefer. Nothing important ever gets deleted.
STEP 5 — TEST WITH REAL EMAILS
Send yourself test emails matching each category and run the workflow. Check that the right Gmail labels appear. If something is misclassified, sharpen that category’s description — the classifier is only as clear as your definitions.
STEP 6 — ACTIVATE AND MONITOR
Flip the workflow to Active and watch the first day’s executions. AI classification costs a fraction of a cent per email, so personal inboxes cost almost nothing to run.
TIPS FOR ACCURATE CLASSIFICATION
Write category descriptions with 1–2 examples each (‘Sales: discount offers, promotions, e.g. Black Friday deals’). Start with 3–4 categories; you can always add more later. Review the first 50 classified emails — that feedback loop is what makes the system trustworthy.
KEEP LEARNING
Want to go deeper? These resources will help:
Complete video tutorial: Gmail AI Automation with n8n — Smart Inbox Setup (classifier walkthrough)